 |
www.riscos.com Technical Support: |
2 Setting up
2 Setting up |
You will need a modem, to convert the digital signals output by the computer to the analogue signals required for transmission across telephone lines. Modems should operate V.32 bis or V.34 protocols, at a minimum rate of 28,800 baud. A 33,600 baud modem is even better.
Slower, older, modems will prove expensive to run, as the time taken to transfer data will be longer, and your telephone bill correspondingly higher.
There is a list of modems displayed by the configuration software (see Modem configuration) which have been tested with Acorn Internet software. This list is not intended to be exhaustive, nor is inclusion in it intended to imply approval by Acorn.
Connect the modem to the serial port of the Acorn computer you will be using as the mail server. The Risc PC uses a standard PC modem cable, while your supplier will tell you which cable to use for earlier Acorn computers. The telephone connection for the modem plugs into the normal telephone wall socket.
You should be able to use the factory settings on the modem. Check the Release Note for any particular items to note when operating modems.
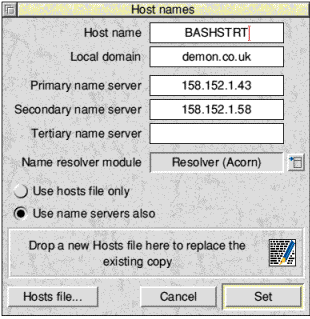
NB: Configuration requires some care, as different Internet Service Providers (ISPs) require different settings. As a guide, we have provided example configurations in the form of completed dialogue boxes for the three main types of connection. You can use these examples to help you complete the configuration dialogue boxes in the next few chapters.
![]()
![]()
![]()
![]()