
 |
www.riscos.com Technical Support: |
This chapter describes how to load Acorn OmniClient, display and mount file servers, and configure OmniClient for your own use.
OmniClient can either be soft-loaded from a hard disc, floppy disc or network mount, or loaded from your Ethernet card.
OmniClient will now be loaded on your icon bar when you switch on your computer.
You may wish to upgrade the ROM on your Ethernet card to one that includes the OmniClient software, especially if you have a site that only has Lan Manager style servers. Please refer to your network card supplier for details on how to make this upgrade.
When LanManFS is present in ROM, it is possible to boot resources and the `front end' of the OmniClient application from this server.
To do this, you need to direct the client station to the required `boot' server. You will need to configure the client by using the following commands:
*Configure fs myfileserver
*Configure filesystem LanMan
*Configure boot
This will tell the client to authenticate as user Armboot in domain `myfileserver', then mount the Armboot share and run the !Armboot file that it may find there.
Click on the OmniClient icon displayed on the lefthand side of
your icon bar ![]()
(or choose FS list from the OmniClient icon bar icon menu).
A window will be displayed, listing all the file servers and shared discs which you can access:
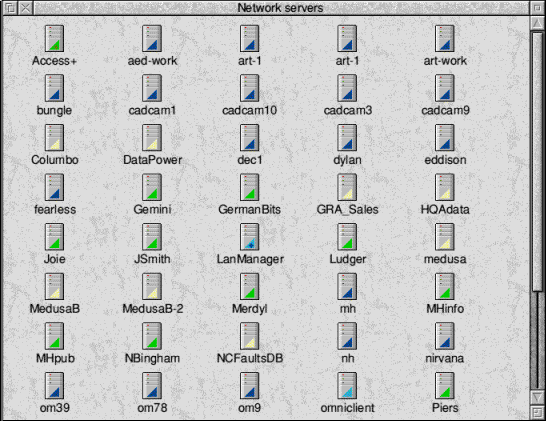
The network filing system to which each server belongs is indicated
by a triangle on the server icon, with the following colour-coding:
| Filing system | Colour code |
| Acorn NFS | dark blue |
| Lan Manager/NT Server (and all other Microsoft options) | light blue |
| Lan Manager (Domain Logon) | light blue with + sign |
| Level 4 | yellow |
| Acorn Access | green |
| Acorn Access+ | green (with a plus sign) |
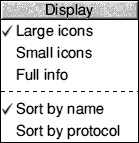
The Filer menu on the file server window allows you the normal display choices of Large icons and Small icons, as well as a Full Info display which contains more detailed information about each type of server. It also allows you to sort the servers by server name or protocol.

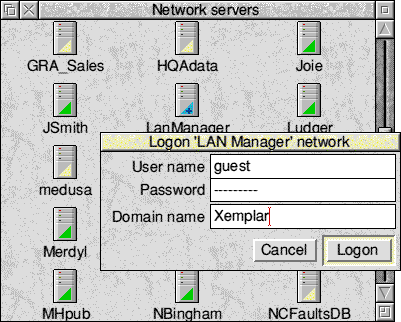
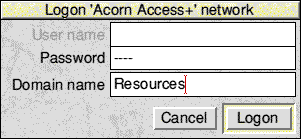
Some network fileservers combine the act of authentication and mounting a particular directory; for example Level4 and NFS. Others, such as Access+ and Lan Manager servers keep these two operations separate - users are invited to authenticate themselves to the network system before mounting any directories to which they are allowed access.
If you are using Access+ or LanMan, you will see `dummy' fileservers called Access+ and LanManager in the list of fileservers window. You may authenticate yourself by clicking on these icons and entering the log-on details in the dialogue box displayed. Once authenticated, network mounts can be selected simply by selecting them from the list of fileservers window.
If a `home' directory is defined for you on an NT/Lan Manager server, this will be mounted with the name `Home'.
If you are using NT Servers, such as the Acorn School Server or Class Server products, you should have set up one server (if you have more than one) as a primary domain controller. This means that you need only authenticate once to have all the resources allocated to you in that domain available for your use. This is a natural consequence of the security model implemented in a Microsoft domain environment.
There are several different ways to mount a file server:
To connect to a particular server, double-click on its icon; you will be connected directly with the server if all relevant information is available, otherwise a Mount dialogue box will be displayed:
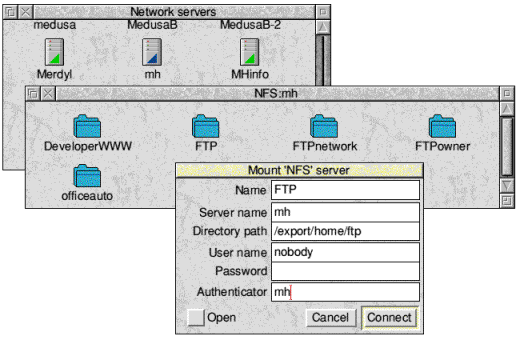
Where mounts have previously been saved (see Mounts file) their details will already be entered in the Mount box, so all you will have to enter is the password.
If you have already mounted a file server, or saved the details of a mount in the Mounts file (see Mounts file) then you can go to the Mounts submenu to display the (partially) completed dialogue box for that mount. This enables easy access to regularly accessed fileservers.
For example:
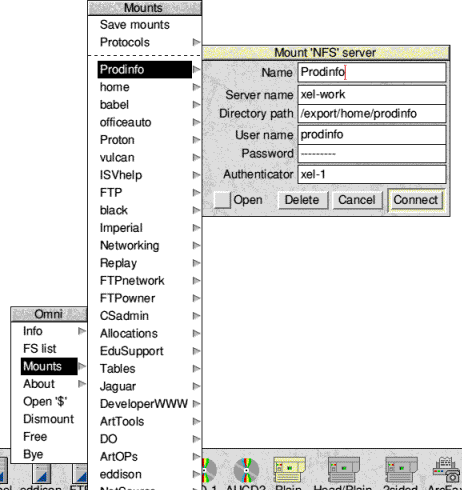
If you choose the Delete option, this mount is deleted from the mounts file if you then choose Save mounts from the Mounts sub-menu.
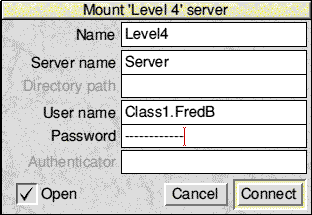
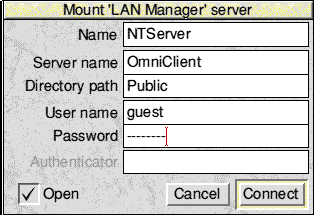
If you need to mount a file server that is not displayed in the list of file servers, you can go to the Protocols submenu and click on one of the available protocols displayed. A dialogue box will then appear (with a default user) enabling you to enter all the necessary details before attempting to mount the file server.
For example:
You can mount file servers automatically from the OmniClient command tail in your Desktop boot file. For example:
Run ADFS::4.$.!Omni mount1 mount2 mount3
See Running OmniClient from your Desktop boot file.
When the OmniClient application is started each mount name is looked for in the mounts file (see Mounts file). If the mount is with a filing system (or server) that needs no password (e.g. Acorn Access), or if the password is in the mounts file, the mount will be accessed immediately and an icon will appear on the icon bar.
If the mount requires a password a Mount dialogue box is displayed for you to fill in.
A mount alias is the name that appears under a mounted server icon on your icon bar. It is defined in the Name field of the Mount server dialogue box.
You can either use the default alias, if applicable, or choose your own alias for a given mount (to aid you, OmniClient suggests a default alias name where it can, by choosing the `short form' of the server name, as shown in the list of file servers). If a mount (either connected or in the saved mounts file) already exists with this name, the mount alias field is left empty for you to fill in yourself.
Each mount must have a unique alias, for all protocols. If you don't choose a unique mount name when you log on to an OmniClient supported server, an error will be generated asking you to choose another name.
When you have successfully logged on to a file server, an OmniClient icon with the name (i.e. the mount alias) of the new mount will appear on the icon bar, and the directory display for the root of the mount will be opened on the desktop, if you have requested it by choosing Open.
After you have established a mount, and an OmniClient icon with the name of the new mount has appeared on the icon bar, clicking Select on this icon will not display the list of file servers, but instead will display the directory mounted by that icon.
To display the list of available servers you must either choose FS list from the OmniClient icon bar icon menu, or click Adjust (not Select) on the OmniClient icon.
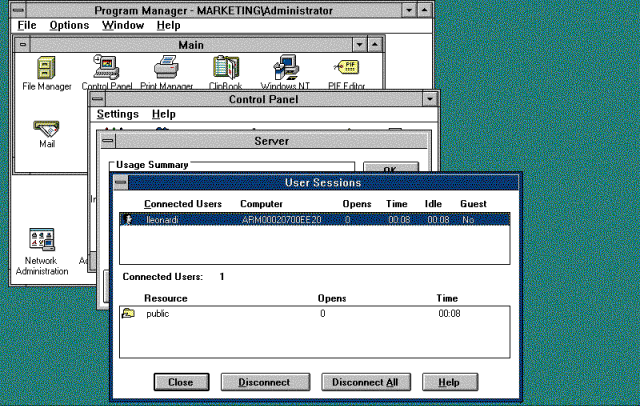
OmniClient allows Acorn platforms to achieve high performance connectivity in conjunction with the Windows™ NT Server product. Acorn clients will appear to the administrator in a very similar fashion to Windows or MS DOS users. The example below shows an active connection from an Acorn Risc PC to the a server:
The following example of File Manager running on a Windows™ NT Server, shows how RISC OS files can be stored and retrieved as users on the Local Area Network require them.
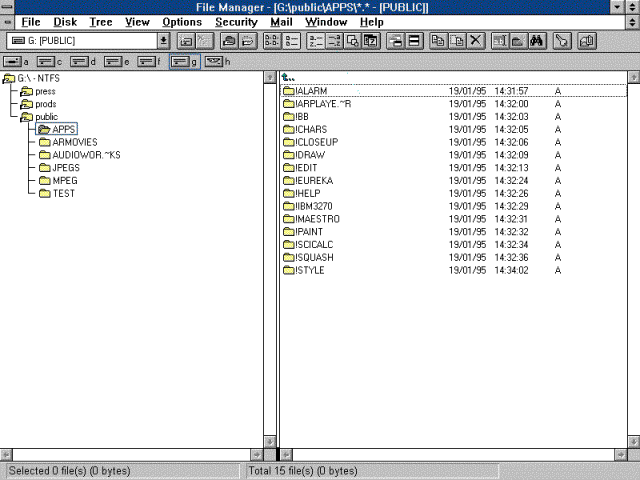
The Windows™ NT Server environment also allows the OmniClient application to choose file servers when storing and retrieving remote files. This means that where more than one file server exists the system can be made totally flexible.
If you set up OmniClient to run from your Desktop boot file, you can add one or more mount aliases to the command tail (the command tail is any additional text you add after the command to run !OmniClient) these will then be mounted automatically (although you may have to supply passwords for the mounts if these are not specified in the mounts file).
Instead of adding a list of mount aliases to the OmniClient command tail, you can just add -ALL, in which case OmniClient will behave as if the command tail listed all the mounts in the mounts file.
By specifying the fileserver type in the command tail (for example Share+, LanMan+ etc.) all the fileservers of this type will be automatically mounted. A dialogue box will be displayed if more information (for example a password) is required.
To support multiple saved mounts files (e.g. master network file for booting, and a writable per-user mounts file), a *command OmniLoadMounts lets a named mounts file be loaded (merged with those already in memory). Mounts will always be saved to the mounts file Omni$Path Mounts unless a mount has the LOCKED flag set (see Flags in the mount file).
About displays the mounts name, server name, directory path, user name and authenticator:
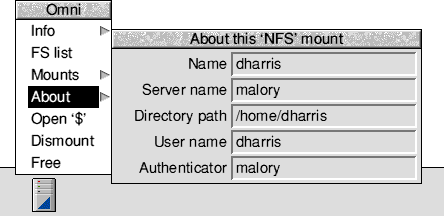
The `authenticator' is required by NFS servers who may have a separate name server machine.
Open `$' opens the user root directory of the file server you are on.
Dismount dismounts the file server and closes any associated directory displays.
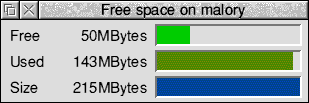
Free opens a dialogue box that shows you the amount of free space on a mount:

|
| 
|
Bye dismounts all active connections and log off all network domains. A confirm box is displayed before this takes place.
To quit OmniClient, click on the Task manager icon on the icon bar to display the Tasks window, click Menu over the OmniClient entry and choose Task/Quit.
Although it is not necessary to access this file under normal circumstances, the mounts file contains the details of any mounts you have specified. The file is in !Omni.Files.Mounts.
To save one or more mounts choose Save mounts from the Mounts submenu. This saves the details of any mounts you have specified to the mounts file.
Each line of the mounts file contains information for a mount. Usually this will be all the information needed to connect a mount with the exception of the user's password, although this can be supplied if the user feels it is not a security problem.
The fields on each line are separated by a comma and white space of any sort other than a new line. The trailing fields on a line may be left off if the null string is to be used. Any line beginning with a `#' character is ignored (and will be lost if the file is rewritten).
Below is an example mounts file:
# > <Omni$Path>Mounts
# Mount list saved by OmniClient at 16:14:54 on 8 Nov 1994
#
# Protocol, Alias, Flags, Server, Mount path, User ID,
# Password, Authentication
#
LanMan,IanC,L,PC1,C:,ian
LanMan,PC2,L,PC2,,ian
NFS,Apps,P,zebedee,/extra/apps,apps,letmein,zebedee
In the previous example the mount called Apps could be mounted without typing a password (it has the one it needs). Also, note that Access does not require a password or authenticator to gain access to a hard disc or CD ROM.
A null password can be represented in the mounts file as the string "" (i.e. two double-quotes without any spaces). This could be used where a guest account has no password, and the user doesn't wish to be prompted for a password to be entered. However, in the case of ShareFS, they are automatically assumed.
The mounts file is automatically updated when you choose Save mounts from the Mounts submenu. This also remembers the state of the Open button.
Extra flags are set from the flags field:
| L | LOCKED |
| H | HIDDEN |
| P | PRESET |
| O | OPEN |
The HIDDEN flag is provided to allow for 'system' mounts which are used in a networked boot sequence (e.g. scrap area) but which remain hidden from the user (not appearing on the icon bar, etc). In conjunction with the LOCKED flag for master mounts file(s), you can setup a very flexible boot sequence that has its complexity hidden from the end user. Note that the HIDDEN flag will not prevent servers/mounts appearing in the 'servers' window that have been auto-located by a network scan (if this is enabled see Application configuration).
To set these flags, you must edit the mounts file to include the strings L, P,O or H flags field.
Note that PRESET and HIDDEN are mutually exclusive, since the purpose of PRESET is to have mounts that cannot be located automatically (for whatever reason) appear in the servers window, and the purpose of HIDDEN is to stop them appearing.
This application gives the network manager an easy way of selecting which network protocols are in use. Note that a choice has to be made between NetBEUI and IP for Lan Manager access. The option to switch on the display of all network servers is also available, as well as the options given below. See also *Configure LanManTransport and *Configure FS.
To allow configuration to be stored on a per-user basis, all configuration files used by the OmniClient application are accessed through the system variable Omni$Path (by default set to !Omni.Files ). This directory contains three files:
The Startup obey file is executed when the application is loaded, and may contain commands to load protocol modules, set Omni$User variables, etc. It can also set the system variable Omni$Options which allows the default configuration of the application in a similar manner to that of Acorn !Edit and Edit$Options. Currently defined options are:
| Option | Action | |
| sN | Sort type | N = 0 (None)
N = 1 (Name) N = 2 (Protocol/Name) |
| sdN | Display type | N = 0 (Large icons)
N = 1 (Small icons) N = 2 (Full info) |
| a | Auto-location of network servers ON |
This is primarily for further reading because the Sort type, Display type and Auto-location of network servers options can be modified in !Omni.Files.Startup. However running !OmniSetup will display these options in a dialogue box permitting a more efficient selection procedure, but the option is still there to modify your choices as you wish.
The a option allows the OmniClient software to scan the network to enable the display of all network servers. If the a option is not present, only those mounts that are specified in the Mounts file will be displayed.
For example:
Set Omni$Options s0 d1
Set Omni$Options a s0 d1
You may wish to edit the Startup file to comment out protocol modules that are not required, or alter the Omni$Options settings, but it is recommended that you use !OmniSetup to do this.
You can use the system variable Omni$UserFilingSystem to set the value of the user name. If the variable is not set but Omni$User is set then the value of this will be used as the default user name. This should ensure that in general on a user's private machine only the password need be typed.
For example:
Omni$UserNFS JSmith
You can use Acorn's standard version of !Printers to access remote printers located or controlled by NT or other Lan Manager-type network printers, or any other network printer type supported.
OmniPrint#FSName;Server;Printer;User;Password;Options;Size:
The fields you must fill in are the FSName, Server and Printer names, although the latter two may be the same for some situations (e.g. a stand-alone AUN printer). Note that User, Password, Options and Size are all optional fields. The file name must be terminated by a colon.
Any filename given is ignored - the critical data is contained in the special field. Fields are semi-colon separated, and illegal (RISC OS) characters should be encoded as follows:
| RISC OS character | encoding characters |
| SPACE | ~_ (underscore) |
| " | ~' |
| | (solidus) | ~l (lowercase L) |
| : | ~1 (numeric one) |
| ; | ~! |
| , | ~. |
| ~ | ~~ |
Examples:
OmniPrint#NFS;ant;lp;nas:
OmniPrint#LanMan;NTserver;NTprint;guest;guest:
For protocols that require the file size prior to the transmission of any data, an optional field Size can be included in the special field (none of the protocols in this release need the size field).
You can also use NFS software in conjunction with the standard RISC OS Printers application to send print jobs to printers connected to remote NFS servers.
Obviously the Printers application needs to use NFS software to send the print job to an NFS server. You should ensure that OmniClient is set up to use NFS before you run the Printers application.
Set up the printer in the same way as any other (see the chapter on setting up printers in the RISC OS 3 User Guide) except for the Connections window, where you should choose NFS and type in some information:
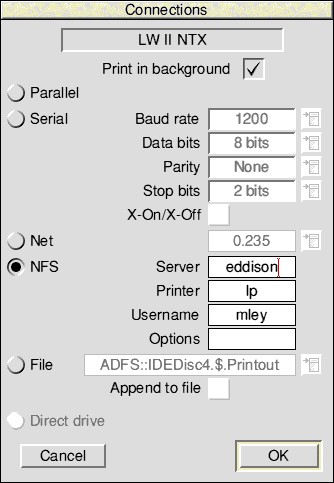
Don't forget to choose Save choices from the Printers icon bar menu if you want the new setup to be saved.
Once you've got everything correctly set up and running, you can use the Printers application just as you always have. Any files you drop onto its icon get converted to the correct format for the remote printer (e.g. PostScript), and then forwarded to it via the NFS server.