 |
www.riscos.com Technical Support:
RISC OS 3 User Guide |
| |


RISC OS 3.7 User Guide
Paint Tutorial
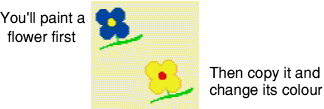
This tutorial section shows you how to use Paint to produce a small, simple picture, made up of two flowers in diagonal corners. In fact you'll only need to paint one flower, you can then copy it and re-colour it

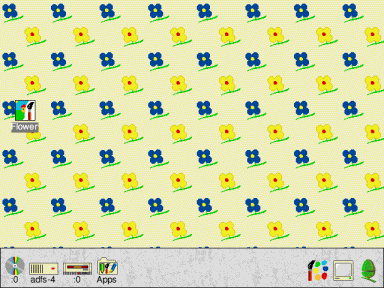
You can then use the Pinboard application to repeat this picture all over your screen producing a 'wallpaper' type background

The tutorial is not designed to show you how to use all the Paint tools - in fact it only uses a few - but to give you a general idea of how the application works.
All of Paint's tools are described in detail in the Paint reference section.
Start Paint
 |
Start Paint by double-clicking on the Paint icon. As with other RISC OS applications, Paint's icon appears on the icon bar. |
Note: Before you start this tutorial, change to a 16-colour square-pixel screen mode such as 800x600.
Create a new sprite
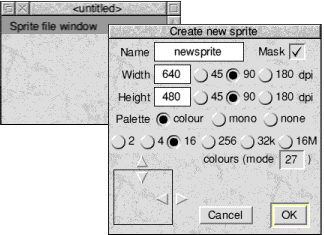
- Click on the Paint icon on the icon bar. This displays the Create new sprite and Sprite file windows
.

- Delete the existing name newsprite (using the Delete key) and type in the name for your sprite< Flowers.
- Change both the Width and the Height of the sprite to be 80.
- Make sure the Mask box is ticked.
- Click on OK and your new (blank) sprite is created.
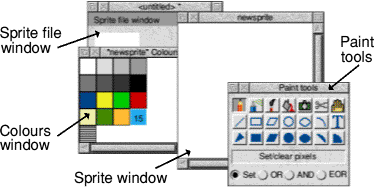
You should now have four Paint windows on your screen.

- the Sprite file window - shows all the sprites in that sprite file
- the sprite window - where you can make changes to the sprite using Paint
- the Paint tools window - contains the tools you can use for painting
- the Colours window - contains the colours you can paint with. (Note that you'll get a different type of colours window when you create a sprite with 32 thousand or 16 million colours - see the section Using colour in applications.
Drag the tools window and the colours window to the right of your screen, and drag the Sprite file window to the bottom left of your screen. Leave the sprite window in the middle of the screen.
Zoom in
The sprite you've just created is very small. To help you see what you're doing, click Menu on the sprite window and change the Zoom factor to 8:1. See the secion Zooming in and out for more information.

The blank sprite will now fill most of your screen, and at this magnification a grid is superimposed over the painting area. Each square in the grid represents one pixel.
Create the first flower petal
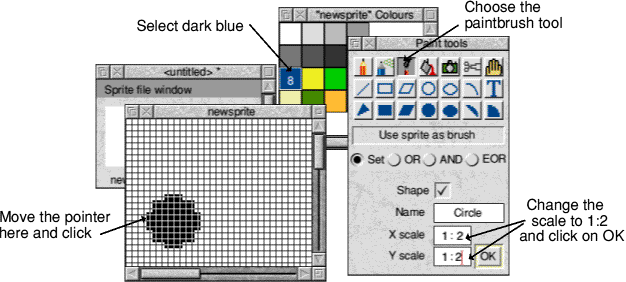
- Choose the Use sprite as brush tool from the Paint tools window (click on it).
The bottom of the tools window will expand to display an area where you can define the type of paint brush you want to use and its size. The default brush type is a circle.
- Reduce the brush size by changing the X scale and Y scale boxes to 1:2, and then click on OK.
- The first flower will be dark blue: Click on the dark blue colour in the Colours window.
That colour will be highlighted and overlaid with the number 8 (to signify that this is colour 8 out of a palette of 16 colours).
- Move the pointer into the sprite window. You'll notice that the pointer is now attached to the centre of a circle. Move the pointer to the approximate position shown below and click. A solid, dark blue circle will appear.

Note: If you accidentally remove either the colours window or the tools window from your screen you can restore them by pressing Menu over the sprite window, and choosing Paint/Show colours or Paint/Show tools.
Save your sprite for the first time
Now is a good time to save your sprite.
- Click Menu over the Sprite file window (not the sprite window).
- Change the name in the Paint/Save/Save as dialogue box to Flower.
The name of the sprite file appears in the Title bar of the sprite file window.
Note: You should save your work frequently as you proceed. You can then return to the last step if you go wrong. This is an especially good idea with Paint, since with some of the tools you can easily make mistakes. Unlike Draw, you can't undo your work in Paint.
Paint the next three petals
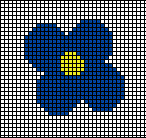
Move the pointer to the centres of the three other circles shown below and click. Don't worry if your circles are in slightly different positions.

Tip: If you've put a circle in the wrong position don't despair, change the colour to white then paint over the incorrect circle. You can then change the colour back to blue and redo the circle.
Save your work again
Once you're satisfied with your four petals, save your work again before you go on. Just click Menu over the Sprite file window (not the sprite window) and choose Save. You don't need to supply a name this time.
Create the middle of the flower
You need a smaller brush to paint the middle of the flower.
- Change the X scale and Y scale boxes in the Paint tools window to 1:4.
- Select yellow (colour 9) from the Colours window.
- Paint a small circle in the centre of your four petals.

Touch up the centre of the flower
If you find that there are one or two white pixels still in the centre of the flower, you can turn them into dark blue pixels.
- Choose the Set/Clear pixels tool from the tools window (the icon for this looks like the tip of a pencil).
- Choose dark blue as your current colour.
- Click Select over any white pixels inside your flower.
Save your work again at this point.
Paint the stem
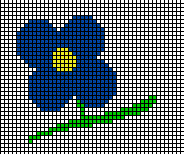
The final step in creating the flower is to paint in a green stem.
- Choose light green (colour 10) from the Colours window.
- Choose the Set/Clear pixels tool from the tools window (you may already be using this tool if you did any touching up).
- Paint the pixels beneath the flower to look like a stem (click on each pixel in turn).
If you click over one pixel, only that pixel will be coloured. If you drag the pointer while holding down Select button, each pixel it moves over will be coloured.

Tip: If you make any mistakes, click Adjust to change the incorrect green pixels back into white ones.
This is another good point to save your work before going on.
Create the second flower
The second flower goes in the bottom right corner of the sprite. However, you don't have to paint a new flower; you can copy the one you've just made.
- Go into the Zoom dialogue box and slightly reduce the magnification factor, then click on the Toggle size icon (in the top right corner of the sprite window) to display the entire sprite.
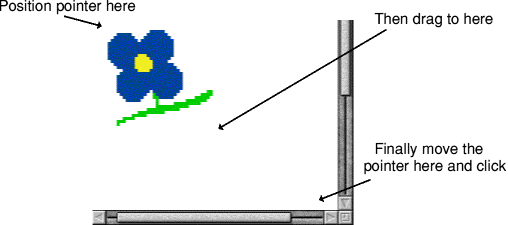
- Choose the Copy block tool and make sure the Local option is switched on at the bottom of the tools window.
- Position the pointer at the top left corner of the flower.
- Hold down Select, drag the mouse to the bottom right corner of the flower and release Select. A light blue rectangle will show the block of pixels that you have copied.
- Move the pointer to the bottom right corner of the sprite window and click.

The light blue rectangle will be replaced by a copy of the flower.
Modify the second flower
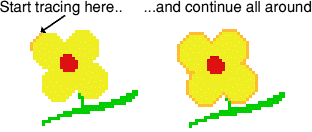
There are two changes you can make to the second flower to make it clearly different from the first one; change the colour of its petals and centre, and trace around the petals.
Change the colour of the flower
- Choose the Replace colour tool.
- Choose red (colour 11) from the Colours window.
- Move the pointer over any part of the yellow centre of the flower and click.
The centre will become red.
- Choose yellow (colour 9) from the colours window.
- Move over any part of the blue petals and click. All the blue pixels that touch each other will be instantly changed to yellow pixels.
Trace around the petals
The final change to make to the second flower is to trace around the edge of the petals to give it more impact.
- Choose orange (colour 14) from the colours window.
- Choose the Set/Clear pixels tool.
- Carefully trace around the outermost yellow pixels of the flower replacing them with orange

You can click on each pixel individually, or drag the pointer round the edge of the petals in one go.
Change the background colour
The white background will be too stark when you use the flowers to cover your entire screen, so:
- Choose the Replace colour tool and switch the Global option on (at the bottom of the Tools window).
- Choose cream (colour 12) from the Colours window.
- Move to any white pixel in the sprite and click.
The entire background of the sprite will be changed to cream.
Your sprite is now finished, so save it and then close the file.
A NAME=MARKER-2-84>
Turn the sprite into a backdrop
You are now ready to wallpaper your screen with your flower sprite.
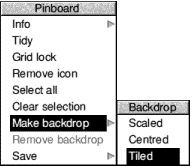
- Drag your sprite file (called Flower) from its directory and drop it anywhere on the desktop background. Its icon will 'stick' to the desktop background.
- Click Menu over this icon and the Pinboard menu will appear.
- Choose Make backdrop/Tiled from this menu.

- Your whole screen will now be tiled with your sprite

You've finished this part of the tutorial. Take a breather. The next two sections (before the Paint reference section) show you some advanced tricks you can use.
Painting with a sprite
This section, and the next, show you how to create some special effects in Paint. Here's how to use a whole sprite as a brush tool, to produce interesting patterns.
- Open the sprite file called Flower.
- Now click on Paint's icon bar icon and create a sprite, 400 pixels by 300.
- In the tools window, choose the Use sprite as brush tool.
- Delete the default name circle, and type in the name of a sprite (in this case - flower).
(The sprite file containing the sprite you want to use as a brush must be open.)
- If Shape is switched on, switch it off.
- Click on OK.
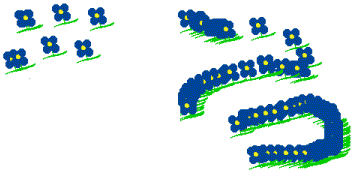
- You can now paint using the sprite as a paintbrush. Clicking once paints a single sprite, and dragging the brush produces a snakelike effect of sprites.
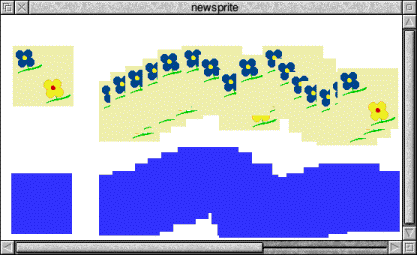
Painting with the mask of a sprite
This section tells you how to use a special colour (a mask) to make parts of a sprite transparent.
- Make sure the sprite file Flower is open.
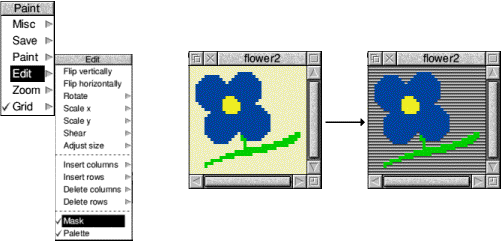
- Click Menu over the Sprite file window and copy your flower sprite - give it the name flower2
- Open flower2, choose Edit/Adjust size from the main menu, and change the width of the sprite to 40 pixels.
This will chop off the right half of the sprite leaving only the flower in the top left half of the sprite.
- Now, if it's not already ticked, choose Edit/Mask from the main menu to create a mask colour
- Choose the Replace colour tool and click on the Global button.
- Choose the transparent colour (colour T) at the very bottom left of the Colours window - you might need to extend the Colours window down a bit to see it.
- Click on the background of the sprite to fill it with the transparent colour..

- Close the sprite by clicking on the close icon.
- Click on Paint's icon bar icon and create a new sprite (don't forget to click on OK).
- In the tools window, select the Use sprite as brush tool.
- Delete the default name and type in the name of the sprite you just created - flower2.
- If Shape is switched on, switch it off and click on OK.
- You can now paint individual flowers, which will have a transparent background colour

You have now completed the Paint tutorial. Save the files you've just created, if you want, or just quit Paint.
The rest of the chapter is a reference section describing the basic elements of Paint, the tools in detail, and how to customise Paint so that it always starts up the way you prefer it.
RISC OS 3.7 User Guide - 22 JAN 1997


 This edition Copyright © 3QD Developments Ltd 2015
Last Edit: Tue,03 Nov 2015


