![[Select]](../images/ro6doc.gif)
|
Configuration System: Pinboard |
|
|
PinboardThe Pinboard section allows you to make changes that affect how the pinboard and RISC OS desktop is presented to the user. Click the Pinboard icon to open this window.  The first section relates to Pinboard Appearance. This section allows you to use a backdrop graphic on the RISC OS desktop or to select a standard colour for the desktop background. Click the Pinboard Appearance icon to open this window. 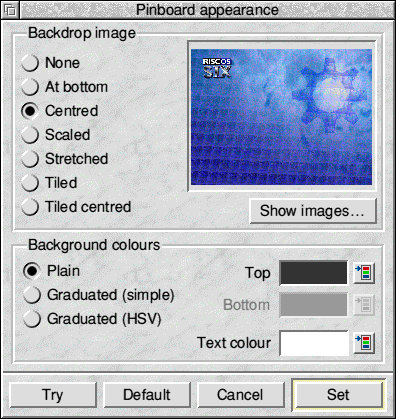 Firstly you can select a background image to display on the backdrop. RISC OS Six comes with a range of background images already included. You can see these by clicking on the Show images button. This will open a thumbnail view of the currently available backdrops. You can drag one of these into the small sample icon in order to change the backdrop. You can also drag in almost any image file from your hard disc and use that as a backdrop. Examples include Sprites, Drawfiles, GIFs and JPEGs. Backdrop images can be placed on the Pinboard in different ways as follows: At bottom places the image at the bottom left corner of the Pinboard, just above the Iconbar. Centred will centre the image at its normal size above the Iconbar. Scaled dislays the image scaled to fit the screen, whilst prevservng its aspect ratio. Stretched will stretch the image in both directions to fill the screen. Tiled begins at the bottom left corner and tiles the image across the Pinboard Tiled centred tiles the image from the centre of the screen. Instead of an image you can use a plain coloured, or a graduated colour backdrop. In order to use a coloured backdrop you will need to make sure that the None button is selected. Then you can select the top colour, for the top of the screen, the bottom colour, for the bottom of the screen (just above the iconbar) and set the type of graduation you would like. To test the backdrop to see if you like it you can click on the Try button. Depending on the colour of the backdrop you may need to set a different text colour for icons placed on the pinboard. You can do this using the Text colour option. Dark backgrounds should have light coloured text, light backgrounds should have dark coloured text. You can return to the default by clicking Default, cancel the changes by clicking Cancel or activate the new settings by clicking Set. The next section relates to the Pinboard Interface. 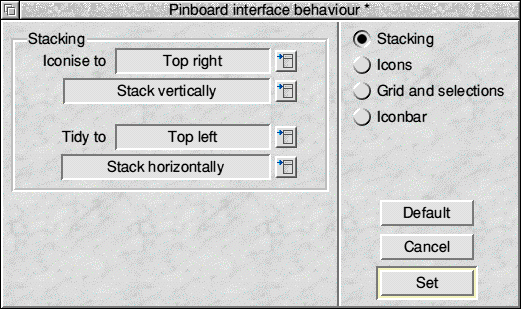 The Stacking section of the window is concerned with the placement of icons on to the pinboard. It defines what happens when you drop an icon or iconise a window to the RISC OS backdrop, or choose the Tidy option. The Iconise to setting lets you set how you want windows to be iconised. You can choose between a Button, the Icon Bar and one of the four corners of the desktop, Stacked either horizontally or vertically. Using the Tidy to function, you can tidy icons to any of the four corners of the desktop, again stacked either horizontally or vertically. 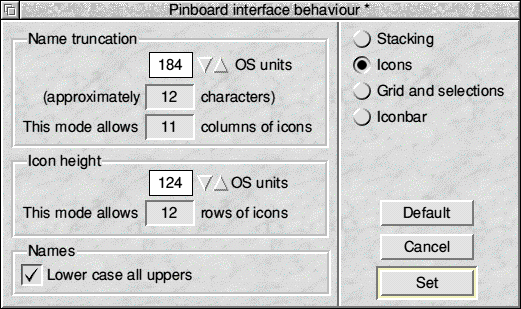 The Icons section deals with how much space is allowed for icons on the Pinboard. Name truncation gives you control over how long names will be displayed, whilst Icon height allows control of how many rows of icons will fit on a given size of screen. Names sets whether to display objects with all capital letters as lower case letters. 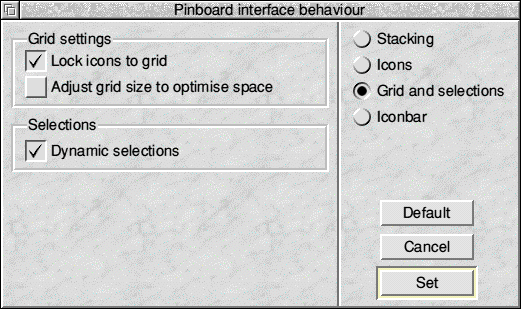 Grid and selections lets you decide configure grid layout and how selections of items behave. The Lock icons to grid option allows you to create a virtual grid on your desktop to which each icon will be locked. This ensures that you do not have one icon overlapping another on the desktop, and hence that you can see everything going on with your system at a glance. The Adjust grid size to optimise space option allows Pinboard to make best use of space available to it. Dynamic selections matches a similar option within Filer and highlights each object as you drag a selection over it, rather than once you complete your selection. This gives more visual feedback as you're working with the mouse. 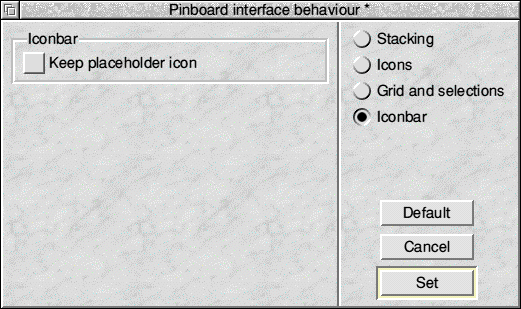 Keep placeholder icon sets whether a small to display an icon on the Iconbar to show that no objects are currently pinned to the Iconbar. This can be useful if you wish to drag pinned files or windows between the Pinboard and Iconbar, as normally dropping objects on the Iconbar would open or run them. You can restore the default settings by clicking Default, cancel any changes made by clicking Cancel or confirm the changes by clicking Set.
|
|
This documentation is copyright 3QD Developments Ltd 2013 and may not be reproduced or published in any form without the copyright holder's permission. RISC OS is subject to continuous development and improvement as such all information is provided by 3QD Developments Ltd in good faith and is believed to be correct at the time of publication E&OE. 3QD Developments Ltd cannot accept any liability for any loss or damage arising from the use of any information provided as part of the RISC OS Documentation. HTML document version r23142 (3rd November 2015) |