|
Draw tutorial
This tutorial section provides you with an introduction to Draw through the creation of a simple picture. Before you start you will need to understand general RISC OS ideas and terms.
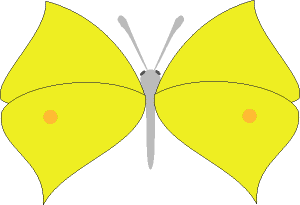
In the tutorial, you will be taken step-by-step through the process of creating this picture of the Brimstone Butterfly.
Selecting Draw objects
Before you start on the butterfly, you should spend a short time practicing how to select objects. This is important because before you can do anything to a Draw object - move it, for instance, or change its colour - you must select it. A Draw picture will typically contain lots of objects overlapping each other, or you may have one object completely behind another. As you work on a drawing you will inevitably find quite often that the object you want to change is not selected, if only because you had to interrupt your work and reload the file.
Accompanying this manual in the Tutorials directory are some sample files that include the files used in the tutorials in this guide.
Before you start work on the butterfly, here is a quick lesson on selecting stacked objects.
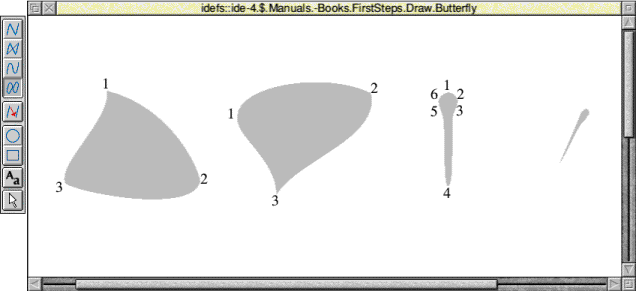
Go to the Tutorials directory and double-click on the file called Plaque. Once this file is loaded it looks like this:

This drawing consists of three objects: the rectangle, the ellipse and the text '3QD Developments Ltd', They are stacked from front to back, in that order. (Incidentally, as you create a series of objects, a newer one will always be in front of an older one, though you can change their order later if you wish.)
To select an object, you first need to choose the correct tool, this is the arrow at the bottom of the toolbox. Click on this and it will be highlighted.
When part of an object sticks out beyond others, you have no problem: as long as you choose that part of the object to click on, it will be selected. When an object is in front of others, again, you have no problem: click anywhere within it to select it. You can do this with the rectangle: click on it and a dotted box will appear around it, indicating that it is selected.
However, suppose you actually want to select the ellipse, perhaps in order to delete it. No parts of the ellipse extend beyond the edges of the rectangle, A click within the ellipse will just leave the rectangle selected, because the rectangle is in front of the ellipse. To select an object that is completely behind another object, you must double-click on it. So now double-click within the ellipse.
The text is behind the ellipse, so you can probably guess by now that to select the text, you should double-click on it. You can think of this as a series of double clicks 'tunnelling down' through a stack of objects.
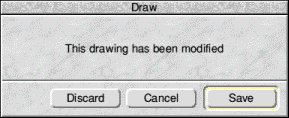
Having practiced selecting objects, there is nothing else you need to do with this file, so you can close it by clicking on its Close icon. If during your experimenting, you have changed the file at all, you will see a message warning you of this; click on Discard to tell the computer you don't want to save your changes.
Draw the butterfly
You are now ready to start on the main tutorial activity: drawing the butterfly.
Find your Tutorials directory, open it and you will find a Draw file called Butterfly. The first thing you should do is to make a copy of this file to another location and work with the copy. Save your work occasionally as you proceed.
Double-click on the icon for your copied file to load it into Draw. Press MENU on the Draw window that appears, move the pointer to Zoom, and rightwards to display the Magnifier box. Click on the righthand up-arrow to give a magnification of 1:2, and then click on the Toggle size icon at the top righthand corner of the window. This will enable you to see the whole file on the screen at once.
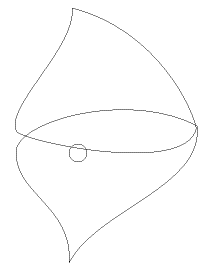
At the top of the window are four grey objects which serve as templates. You will trace them to form the two wing shapes, the body, and the antenna (you can do the eyes by yourself!). Below the templates there is a space where you will create your picture.
Draw the first wing
Call up the Magnifier box again, and set the magnification to 1:1 by clicking once on the righthand down-arrow. Use the scroll bars to move around the page until you see the upper wing template near the top lefthand corner of the page.
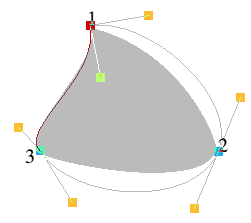
Click on the closed curve tool in the toolbox. When you move the pointer back onto the Draw window it changes shape to a star. To trace the wing, follow these steps:
- Position the pointer over the top corner of the shape, at point 1. Click SELECT.
- Without holding any mouse buttons, move the pointer to point 2. Click SELECT again.
- Move the pointer to point 3, and double-click SELECT . This completes the path automatically, connecting point 3 to point 1.
You have now drawn an outline shape as shown below, meeting the wing template at the three points where you clicked or double-clicked.
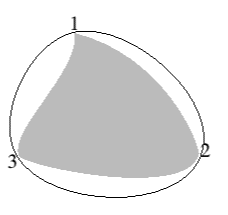
This doesn't look much like the wing yet. The next stage is to edit the shape you have drawn.
Choose the Select tool at the bottom of the Toolbox. The pointer changes back to an arrow. Click somewhere in one of the spaces between the grey wing template and the shape you have drawn. This selects your shape ready for editing. Now follow these steps;
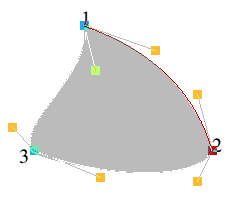
- Press MENU and move to the Select submenu. Click on Edit. The shape now appears like this:
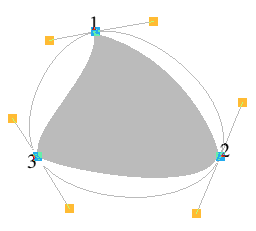
At each point where you clicked or double-clicked when creating the shape is a blue square. These are the end points. From each end point two lines sprout, each ending in an orange square. These are the control points. Use the control points (and the end points if necessary) to make your shape match the grey template, as follows:
- Move the pointer over the top lefthand control point, and press ADJUST. The leftmost segment of your shape will change to yellow. This means that the segment is selected for editing.
- Using ADJUST, drag the lefthand control point down and to the right. As you do so, the red segment changes shape, getting closer to the template. When it meets the concave curve of the template, release ADJUST. Your selected segment will appear in green if its path crosses the template - this is just due to the combination of red and grey. You will also notice that the orange control point you moved is now yellow. None of these colour changes is significant in itself.
- Move the pointer over the leftmost control point, and drag it with ADJUST leftwards and downwards so that the selected segment matches the template as closely as possible.
- You may now need to return to the control point you moved first to adjust it again.
- Repeat the process with the other control points, until the template and your path match.
The template and your outline will now look like this:
Click SELECT with the pointer anywhere on the Draw window (but away from the other templates). This takes you out of Edit mode. Choose the arrow tool again, move the pointer inside the wing shape and click SELECT to select it. Drag your outline up the screen, away from the template. It doesn't matter exactly where you leave it; the only purpose of moving it is to make it easier to select the next time you need it.
Tips:
- If at any time you press the SELECT button by mistake, move the pointer over the shape and press ADJUST; this is an alternative way of selecting an object for editing.
- If you have misplaced an end point, it can also be dragged using ADJUST, until it is where you want it.
- If you make a mistake while drawing, use the Undo option in the File menu. Each time you click on Undo you erase any changes you have just made. Clicking on Undo twice erases the last two changes you have made. Choose Redo to reinstate the changes.
Draw the second wing
To create the second (lower) wing, the process is the same:
- Select the closed curve tool again.
- Draw the initial outline by clicking at the three marked points.
- Choose the select tool (the arrow) and select the outline shape you have drawn.
- Go into Edit mode by choosing Edit from the Select submenu.
- Drag the control points so that your outline and the template coincide as with the first wing.
- Again, click SELECT away from the template, select your outline of the second wing and drag it away from the template.
This wing will have a small circle on it; this is not provided on the template, as it is very easy for you to create. Follow these steps:
- Press MENU and move to the Grid submenu. Using ADJUST, click on Lock. The menu will remain on screen (because you clicked with ADJUST instead of SELECT), and the word Lock will appear in the Title bar of the Draw window, indicating that the Grid Lock is on. The purpose of locking to the grid is to make it easier to use the ellipse tool as a circle tool,
- Before drawing the circle you must change the units of the grid. The default is 1/2 centimetres, which for our purposes is too coarse. While you still have the Grid menu on the screen, move to the Inch option and display the Inch spacing submenu. Using SELECT click on 1 x 10.
- From the Toolbox, choose the ellipse tool.
- Move the pointer onto your outline of the second wing, and position it roughly where the circle is in the drawing below. Click SELECT once, then move the mouse downwards and to the right to create a circle like this:
- Click SELECT again when the circle is about how you want it. When you have done this, if your circle is not exactly the right size, select it, and drag the 'ear' at the bottom righthand corner of the box until it is the size you want. If it is not in the right place, position the pointer inside the circle and drag it with SELECT.
Draw the butterfly's body and antennae
Follow the same steps to trace the body and one of the antennae; templates are provided for each of these. Switch off grid lock before you start. For the antenna you will need to zoom in to a much larger magnification: try 4:1 or 5:1. The target positions for the control points are like this:
For editing the body shape you wi!l only need to move the control points attached to 4. When you have traced all four objects, reduce the magnification to 1:2 so that you can again see the whole page.
Start assembling the butterfly
From now on, you can ignore the grey templates, as you will just be working with your own shapes. The first task is to put the two wings together and create a mirror-image pair of wings. Use a magnification of 1:2 while you get the components into roughly the right place, then change to 2:1 or 1:1 to position them more accurately.
Before you move the lower wing, you should group the wing and the small circle together. Choose the select tool and start with the pointer above and to the left of the wing outline. Drag using SELECT to stretch a box around the two objects. When you release SELECT, they will both be selected. Click on Group in the Select submenu to group them together; they will then behave like one object until you ungroup them again. When you select a grouped object, it will have just one dotted box around it.
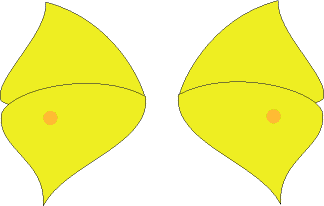
Now select your outline of the first (upper) wing, and if necessary drag it to a clear space. The window will scroll if you drag over its frame. Select the second wing, and drag it so that it is just below the first wing, with the points on the righthand side meeting, like this:
Colour the butterfly's wings
This is a suitable point at which to choose the colours for the butterfly's wings (before you make the second copy). First select the lower wing and ungroup the wing and the circle by selecting Ungroup from the Select menu.
Click ADJUST outside the circle but inside the wing: this deselects the wing, leaving the circle selected.
Display the Style submenu. Carry out the following sequence of operations with ADJUST, so that you do not have to keep redisplaying the menu.
- Display the Line colour dialogue box. Click on None, then on OK.
- Display the Fill colour dialogue box. Click on the orange box, next to the sky blue in the bottom righthand corner of the box. Using SELECT (since this is the last step in this sequence), click on OK.
Now to colour the wings themselves.
- Select the two wings by clicking SELECT on one, then ADJUST on the other.
- Display the Style menu again
- Leave the line colour as it is lit is black by default!.
- For the nil colour use the bright yellow (next to the royal blue in the bottom lefthand corner of the Fill colour dialogue box).
Now that the lower wing and the circle have been coloured, group them together again, and this time go on to group the two wings together as well. You now have a 'nested structure' of objects: the lower wing and the circle form a single grouped object, which is itself grouped at the next level up with the upper wing to produce another grouped object. You will find this multi-level grouping very useful when
Create the second pair of wings
The next step is to create a copy of the pair of wings and turn it into a mirror image.
Select the wings and click on Copy to clipboard from the Edit menu. Now position the mouse pointer level with the bottom of the wing and slightly to its right and press Ctrl-V to 'paste' the copy of the wings previously placed on the clipboard. Alternatively you can press Ctrl-D which will make a copy (D uplicate) of the object slightly below and to the right of the original.
To flip the copy around its vertical axis, use the Transform submenu. Move to the X scale option and display the small box labelled X scaling. It will appear with the number 1.0 entered; change this to -1.0 and click on the box or press Return. The copied pair of wings will flip over, and you can drag them roughly into position:
The copy will have the same grouping structure as the original.
Colour the body and assemble the butterfly
Using the same technique that you used to colour the wings, select the butterfly's body and give it a light grey colour, with no Line colour. Colour the antenna the same grey, make a copy of it and flip the copy, using the same technique as for the second pair of wings.
Select the body and drag it into position next to the first pair of wings (you may need to move the body to the front). Drag the second pair of wings and the antennae into position (you will need to zoom in to do this accurately - 2:1 should be enough):
Add the eyes
It remains only to draw the eyes and write a caption to your picture. Select the ellipse tool. Choose a large magnification - such as 4:1 - so that you can see what you are doing.
You can choose the style of an object before you draw it. As you have already selected the ellipse tool, the style you select now will apply to any objects you draw with that tool, until you change the style. From the Style submenu, set the Line colour to None and choose a dark grey for the fill colour.
Now draw a small ellipse for the butterfly's eye. Rotate it if necessary by placing the pointer on the 'ear' at the top right of the dotted box, and dragging down (to rotate clockwise) or to the left (to rotate anti-clockwise). To create the second eye, copy the eye you have drawn and flip it, as before. If you cannot see the copy, this will be because at this magnification, it has been created outside the area you are currently displaying with your window. Enlarge the window or use the scroll bars (looking down and to the right of the original) until you find the copy. Move both eyes into position.
Return the magnification to 1.1.
Finish off and give your picture a caption
Choose the select tool and position the pointer above and to the left of your picture. Drag a box around the picture and release SELECT when the box encloses the whole picture. All the objects that comprise your picture will be selected. From the Select menu, click on Group to make your picture into a single object. Pressing F4 is a shortcut you can use instead of the menu.
To create a caption, select the Text tool. Move the pointer to an area below your picture and click SELECT. A red caret (an I-shaped bar) will appear. Select a font for the title from the Style submenu, as follows:
- From the Font name submenu, select Trinity.Medium (click with ADJUST and the menu will stay on the screen).
- Display the Font size submenu and click on 14.
Type Brimstone, and press Return. Then type butterfly and press Return. Select both lines of the caption and Group them. From the Select submenu, go to the Justify submenu and click on Centre.
Finally, move the caption to the position you want next to your picture and group it with the picture,
That concludes the Draw Tutorial; the rest of this chapter is the reference section, which details in full the features of Draw.

|
![[Select]](../images/ro6doc.gif)