|
Paint tutorial
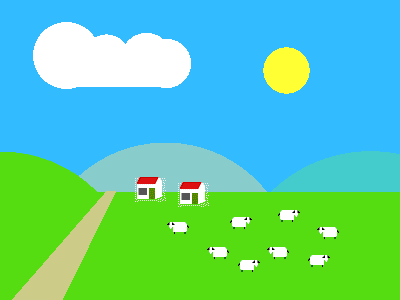
This is a tutorial section that shows you how to use Paint to produce a simple picture (shown below). The tutorial is not designed to show you how to use all the Paint tools - in fact it only uses a few - but to give you a general idea of how the application works.
For the tutorial, you should use a 256-colour screen mode. Use the Display Manager to set the number of colours to 256. There is no reason why you could not use 32 thousand or 16 million colours, but as some users may not be able to use such a large number of colours the tutorial describes the use of only 256 colours so that the descriptions and illustrations will be consistent for all users.
The landscape sprite is built from two types of component: the landscape itself. which you will create from scratch, and the sheep and house shapes which are themselves small sprites that we have provided for you. Towards the end of the tutorial you will learn how to superimpose these on your landscape.
Starting Paint
 Open the Apps directory by clicking on the Apps icon on the icon bar. Start Paint by double-clicking on the Paint icon in the directory display. As with other RISC OS applications, Paint indicates it has been loaded by displaying its icon on the icon bar. Open the Apps directory by clicking on the Apps icon on the icon bar. Start Paint by double-clicking on the Paint icon in the directory display. As with other RISC OS applications, Paint indicates it has been loaded by displaying its icon on the icon bar.
Creating a new sprite
The first step in creating a new sprite is to click on the Paint icon on the icon bar. This displays the Sprite file window. Click on the Create new sprite button on the toolbar at the top of this window and the Create new sprite window will open.
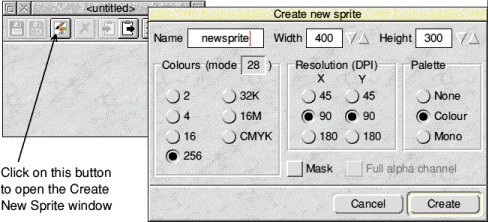
The Create new sprite window lets you type in the name you wish to give to your new sprite.
For this tutorial delete the existing name Newsprite (using the Delete key) and type in the name for our sprite, Landscape. Now change the size of the sprite to be created by clicking on the Width box and changing the value to be 400 and then clicking on the Height box and changing the value to be 300. You may also need to ensure that the Mask button is not ticked.
The other values can be left as their defaults, which should be as shown. Colours should be set to 256 and Resolution should be set to 90 DPI (Dots Per Inch) for both X and Y. Since we want a colour sprite Palette should be set to Colour.
Click on the OK box and the (blank) sprite is created. The sprite window is displayed together with the Colours that you can paint with.
The sprite window is in effect the artist's canvas where changes can be made to the sprite using Paint's various tools. Any changes made in the sprite window are instantly reflected in the sprite file window.
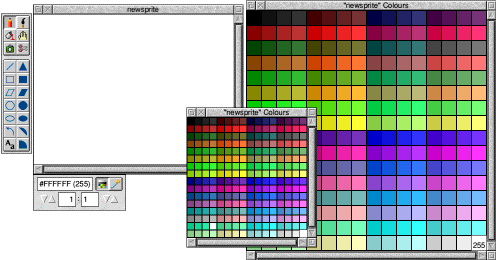
You should now have three Paint windows on your screen. The sprite file window (not visible in the illustration above), the sprite window and the colours window. In some screen modes (e.g. 640 x 480) the colours window is rather large, and you would need to scroll it to see the full range of colours. To display a smaller version, press MENU with the pointer on the sprite window, move to the Colour submenu, and click on Small colours. Both colours windows are shown in the illustration above although you would normally see only one. The small colours window fits on the screen better, but has the disadvantage that the colours are not so clearly visible. However, for the tutorial, it won't matter which colour window you use.
If the sprite has a mask, an extra, special colour is shown in the bottom lefthand corner of the sprite colours window as a grey or shaded square. You can use this colour - in the same way as any other colour - for making pixels transparent. This can be useful if, for example, you wish to design a sprite so that if it is displayed on top of something else the background can be seen through the pixels set as a mask rather than a colour.
Drag the windows around the screen so that you can see all of them at once since when they first open they may overlap.
Zooming in and out
You will be able to see what you are doing more easily if you double the size of the sprite window. At the bottom left of the sprite file window is a small tool window. This is context sensitive, so will change as you select various tools (as we shall see later), by default it contains the Zoom tool which allows you to magnify the view. Click on the up arrow on the left to create a magnification of 2:1.
Creating a blue background
To create a blue background, which will become the sky, follow these steps:
- Firstly, make the sprite full size by clicking on the Toggle size icon in the top right hand corner of the window.
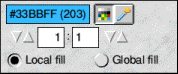
- Click over a suitable sky-blue coloured square in the colours window. The colour square is highlighted when it is selected (if you use the large colours window, the colour's number will appear in the square as well). The colour will also appear in the 'tool pane' at the bottom of the window.
- Click over the Replace colour icon on the Paint toolbar (shown left). The tool indicates it has been selected by the icon appearing depressed and the 'tool pane' at the bottom of the window will change as shown below. Two buttons will appear, Local fill and Global fill. By default Local fill is selected.
- Position the pointer in the sprite window and click SELECT. The entire window will be filled with the selected colour. This new background colour will also be displayed in the sprite file window.
Saving your work
You should save your work frequently as you proceed. You can then return to the last step if you go wrong This is an especially good idea with Paint, since with some of the tools you can easily make mistakes. Unlike when using Draw, you cannot undo your work or move single objects, since Paint does not create objects as such.
 To save the whole sprite file click on the disc icon on the Sprite file window toolbar (shown left). This will open a Save as dialogue box. As with any other application, you should delete the default name that appears and drag the icon to the directory where you want to save the file. The name of the sprite file now appears in the title bar of the sprite file window. If you see a star character (*) after the name in the title bar then this means you have made changes to the sprite that have not yet been saved. To save the whole sprite file click on the disc icon on the Sprite file window toolbar (shown left). This will open a Save as dialogue box. As with any other application, you should delete the default name that appears and drag the icon to the directory where you want to save the file. The name of the sprite file now appears in the title bar of the sprite file window. If you see a star character (*) after the name in the title bar then this means you have made changes to the sprite that have not yet been saved.
Creating the landscape
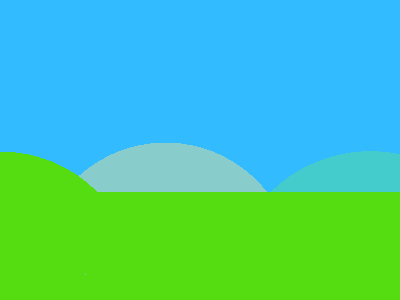
 The landscape is made up out of several regular shapes painted partially overlapping one another. The distant hills are painted first. Choose a light grey colour and the Filled circles tool (shown left). Move the pointer back over the sprite window. Click once near the bottom of the window, a little to the left of centre. This defines the centre of the circle. Move the pointer upwards; as you do so, a circle shape tracks the position of the mouse. At this stage the circle will not appear as the correct colour. When the circle is the size you want, click SELECT again to 'fix' it and at this point it will assume the correct colour. Aim for a circle looking more or less like this: The landscape is made up out of several regular shapes painted partially overlapping one another. The distant hills are painted first. Choose a light grey colour and the Filled circles tool (shown left). Move the pointer back over the sprite window. Click once near the bottom of the window, a little to the left of centre. This defines the centre of the circle. Move the pointer upwards; as you do so, a circle shape tracks the position of the mouse. At this stage the circle will not appear as the correct colour. When the circle is the size you want, click SELECT again to 'fix' it and at this point it will assume the correct colour. Aim for a circle looking more or less like this:

If you realise you have positioned the centre in the wrong place before you click a second time, you can make a fresh start by returning the pointer to the toolbar and clicking on the Filled circle icon again. This clears what you have already done.
If you don't like your circle when you have finished it you can remove it by selecting the original sky blue and the Replace colour tool again. Now click in the circle. This will fill the circle with sky blue. effectively erasing it.
Once you are satisfied, save your work again before you go on.
Now choose a bluish-green colour and paint another circle with the centre near the bottom righthand corner of the sprite, and the edge roughly in line with the grey circle:

Select a more yellowish green and draw a third circle with its centre near the bottom lefthand corner of the sprite:

 Keeping the same colour selected choose the Filled rectangles tool (shown left). Place the pointer at the very left hand edge of the sprite, about halfway down. Click SELECT. Move the pointer downwards and rightwards to the bottom righthand corner; just move the pointer - there is no need to use a drag. Position the point of the arrow carefully within the sprite window, or nothing will happen. Click again. Paint will create a rectangle, which will merge in to the last circle you painted, being the same colour. Keeping the same colour selected choose the Filled rectangles tool (shown left). Place the pointer at the very left hand edge of the sprite, about halfway down. Click SELECT. Move the pointer downwards and rightwards to the bottom righthand corner; just move the pointer - there is no need to use a drag. Position the point of the arrow carefully within the sprite window, or nothing will happen. Click again. Paint will create a rectangle, which will merge in to the last circle you painted, being the same colour.
Save your work again at this point.
Now paint the road. Select one of the buff colours in the bottom row of the colours window. To obtain a perspective effect, the road is painted with two filled triangles, so select the Filled triangles tool. Move the pointer back onto the sprite window and position it at the top of the foreground green area, just to the right of the hill. Click SELECT. Move the pointer down and to the left, as far as the bottom of the sprite. As you do this, a line will join the point where you clicked with the current pointer position. At the very bottom of the sprite, click SELECT again, then move the pointer rightwards and click again.
You should have a triangle like this:
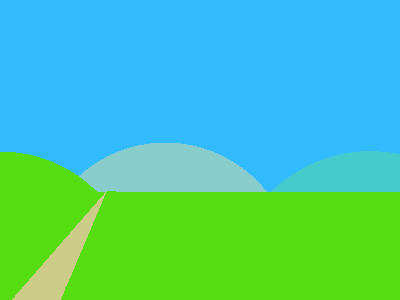
Create a second triangle alongside the first, with its apex meeting the bottom righthand corner of the first triangle. The two triangles should merge to form the road. narrowing into the distance:
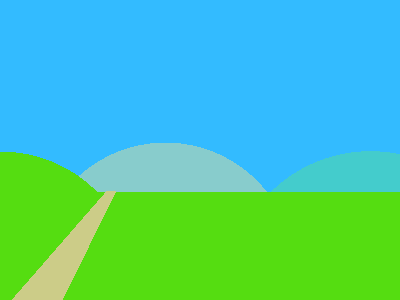
You may find that the triangles have not quite joined up as you intended. You can tidy up using the Set/clear pixels tool at the top left of the toolbar. Zoom in on the picture so that you can position the pointer accurately and look for the places where your road shape needs touching up. Click SELECT to paint individual pixels in the road colour.
This is another good point to save your work before going on.
Using the sheep and house sprites
The next stage is to paint some sheep onto the landscape. We have created two sheep sprites for you: they are in the sprite file called Brushes in the Examples.Paint directory. Double-click on this file to load it into Paint. When the Brushes sprite file window opens you will see the three sprites in it: house, sheep1 and sheep2. Move the pointer back to the Paint toolbar and select Brush tool (the icon shaped like a paint brush). The tools window will now look like this:
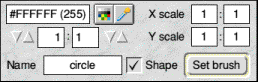
The red caret will be in the Name box, after the word circle. Erase this word and type sheep1 in its place. Now click on the ticked Shape icon to deselect it and finally click on Set brush. Provided the sprite file containing the sprite named sheep1 is open (and it is, because you have just opened it), it will be loaded so that you can use it in your landscape picture.
The Shape option when selected allows the shape of a sprite to be used as a brush; it is used as a filled shape with its colour taken from the Colours box. With the shape option deselected, the sprite is placed with its form and colours intact.
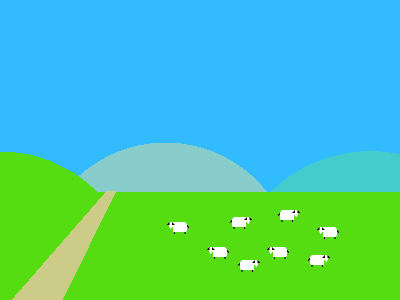
Move the pointer back over the sprite window. A sheep in various exotic colours (depending on where the pointer is) will follow your pointer around the screen. Click SELECT to paint a sheep. Paint a few to the right of the road:
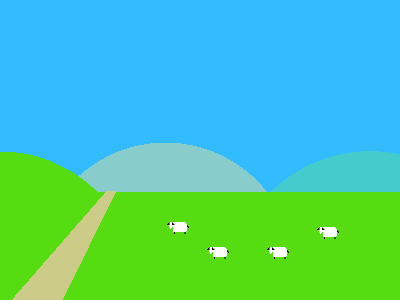
Sheep2 is the same as sheep1, except that it faces the other way. Go through the same process to use sheep2, and paint a few of those:
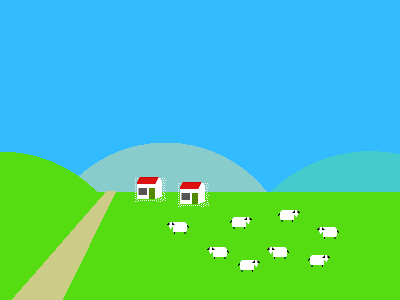
Use the house sprite to paint a house, or several houses.
Paint the clouds and the sun
Since white clouds often have a rather flat base, begin by selecting the Filled rectangles tool along with the colour white, found at the bottom righthand corner of the colours window. Draw a small rectangle towards the left of the sky. Switch to the Filled circles tool and build up the cloud using small circles of varying sizes.
Create the sun by selecting a nice bright yellow and the Filled circles tool. Your picture will now look something like this:
You have now completed the Paint tutorial. The drawing described is rather crude, but in creating it you will have learned how to use many of the tools and techniques required for more sophisticated pictures.

|
![[Select]](../images/ro6doc.gif)