|
The Sprite file window
The sprite file window shows all the sprites defined in the file. The sprites in this window are updated as you edit them in a sprite window. You can have more than one sprite file window open at a time. If you close a sprite file window, all the sprite windows associated with it that are currently open will close.
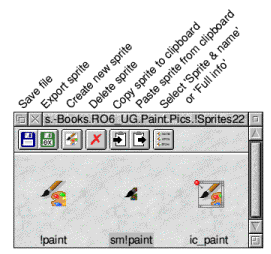
There is a toolbar at the top of the sprite file window and the functions of these tools are shown below.

To open a sprite window for a sprite, double-click on it in the sprite file window.
The actions of the buttons are;
- Save file opens a Save as window for you to save the sprite file.
- Export sprite will only be active if a sprite is selected. It opens a menu which lets you save the selected sprite in various 'foreign' formats.

- The next button opens the Create new sprite window. Note that you can also open the Create new sprite window by double-clicking SELECT in any empty area of the sprite file window.
- Delete sprite will remove the selected sprite from the file.
- The next button will copy the selected sprite to the clipboard.
- The following button will paste a sprite on the clipboard into the file.
These previous two buttons can be used to copy sprites from one file to another.
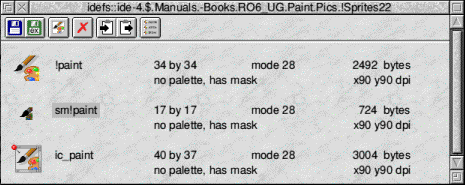
- The final button toggles between the two view formats available for the sprite file window. The one in the window above is called Sprite & name and the alternative Full info is shown below. This has the advantage of giving a lot more information about each individual sprite but it does take up much more space.

The Sprite file menu
There is a menu associated with sprite file windows. Click MENU over the window to obtain it. The menu entries are as follows:

- The first item on this menu, File, leads to a small submenu, as shown above, with two items. Info leads to a window with information about the sprite file. Save leads to a standard Save as dialogue from which you can save the file
- Display leads to a submenu where you can choose between Sprite & name or Full info display formats.
There is another item on this sub-menu Use desktop colours: choose this to toggle whether the desktop colours, or the BBC microcomputer-compatible set of standard default colours for the sprite mode are used in displaying sprites. Using the desktop colours will show you how the sprite would appear if used as an icon. This option is ignored if the sprite has its own palette.
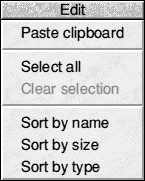
Edit leads to a sub-menu.

The top item on this menu, Paste clipboard allows you to paste any sprite file on the clipboard into the sprite file window. The next two items let you either select all the sprites in the file or de-select any previously selected. The lower three allow you to sort the sprites in the sprite file window in various formats.
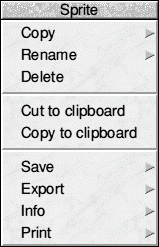
If a sprite is selected then Sprite <name> will be active and will lead to the following sub-menu:

- Copy lets you make a copy of the selected sprite. Enter the name you wish the copy to have in the writable icon and press Return and a copy will appear in the sprite file window.
- Rename lets you change the name of the selected sprite. Enter the new name and press Return to change the name of the sprite.
The other items on this menu duplicate functions already described elsewhere.
New sprite leads to the Create new sprite window.

|
![[Select]](../images/ro6doc.gif)
![[Select]](../images/ro6doc.gif)