|
www.riscos.com Technical Support: |
This chapter shows you some more desktop options to help you use hard discs and floppy discs.
Most computers are fitted with a floppy disc drive and a hard disc drive. A hard disc can store large amounts of information for long periods of time; then, when needed, it can retrieve the information quickly so that it can be used again. A floppy disc holds much less information than a hard disc, and can't retrieve it so quickly. You'll find some more general information about discs and disc drives in the All floppy discs and hard discs can be given names. Names that you recognise and understand are helpful.
The name of a hard disc appears underneath the hard disc icon on the icon bar, and in the title bar of directory displays. Names of floppy discs are only shown in the title bar of directory displays. The floppy disc drive icon on the icon bar always has the drive number beneath it. This will be :0 unless you have more than one floppy drive. If a hard disc is not given a name it is given the number :4. If a second hard disc is fitted, it is given the number :5.
Each disc may be referred to either by a name, or by the number of the drive on which it is mounted. You should use names, since the filing system can prompt you to insert a floppy disc by name if it is needed.
It is advisable to keep disc names unique, so that the filing system can tell them apart. If you don't name a floppy disc when you format it than it is automatically given a name based on the current date and time.
To set or change the name of a disc:
If you have any directory displays open for the disc under its old name, they will be closed when you rename the disc.
A disc name must contain at least two, and at most ten, printing characters. The name must not contain a space or any of the following characters:
$ & % @ \ ^ : . # * " |
If you are using a DOS disc that was given a single-character name on another machine, you will only be able to rename the disc on the other machine.
If you change the name of a hard disc you may find that certain start-up files no longer operate correctly. This is probably because they refer to the old hard disc name rather than the new one. The files that may need changing are discussed in Customising the desktop start-up procedure.
When you've displayed a disc's root directory (this can be a floppy or a hard disc) the disc is said to be 'mounted'. When you have finished with a disc, it is useful to 'dismount' it (and essential to dismount a DOS disc). This closes all the files on the disc, removes its directory displays from the screen, and tells the computer to forget about it.
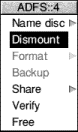
To dismount a disc:
Warning: Do not dismount a disc during a Filer operation on that disc. Formatting a disc means setting up a structure on the disc within which data can be stored. You will need to format a disc in the following circumstances:
Hard discs are supplied ready-formatted, and you should not need to reformat them. In the unlikely event that a hard disc does have to be reformatted, use the application !HForm.
If the disc verification process finds errors on the disc see the section Disc errors during formatting for instructions on how to remove them.
RISC OS floppy disc formats and Other disc formats describe the available disc formats in more detail.
Faults that prevent data from being read from or written to a part of the disc are known as defects.
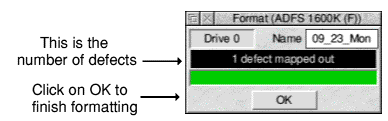
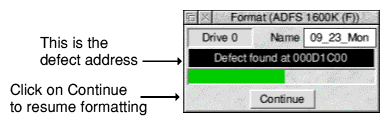
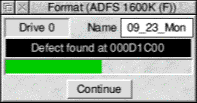
The formatting process is designed to deal with any defects found on the floppy disc. Any defects found are displayed during the formatting and verification process.
If a defect is found, click on Continue. This marks the area of the disc as defective and ensures that it is not used. If you don't want to continue with the format/verify process, click on the window's Close icon.
While RISC OS will allow you to use a floppy disc with defects (by 'jumping over' or ignoring those defects) we recommend that, unless you have an immediate need to use the disc, you throw it away at the first opportunity.
When formatting has finished the window shows you how many defects were mapped out (marked as not to be used).
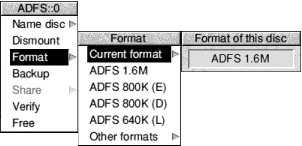
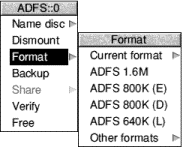
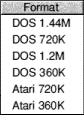
There are four different RISC OS formats available:
DOS-formatted discs should only be used if you are transferring files to or from a DOS computer or storing DOS files on the disc. Files stored on DOS discs are stored according to DOS file naming conventions and not RISC OS conventions.
For more information about DOS files and discs, read Using DOS and Windows discs.
There are different PC-compatible formats for floppy discs. These formats are compatible with computers that use the DOS operating systems (i.e. MS DOS, DR DOS or PC DOS):
Note: If your machine has no VRAM, it is recommended that you switch to a screen mode that uses less memory than 800x600x256 colours (e.g. 800x600x16) to format discs in DOS format.
Atari-formatted discs should only be used if you are transferring files to or from an Atari computer or storing Atari files on the disc. Files stored on Atari discs are stored according to Atari file naming conventions and not RISC OS conventions.
There are two different Atari-compatible formats for floppy discs:
Many UNIX computers incorporate software that allows the computer to read and write to DOS-formatted discs in much the same way that RISC OS does. Most Apple computers also have software that allows the computer to read and write to DOS-formatted discs.
If you want to find out what type of format a floppy disc has, put the floppy disc in the disc drive and go to the Format/Current format box. This will tell you the format type and storage capacity of the floppy disc.
It is essential that you keep backup copies of your important files, in case they get damaged. You might delete a file by mistake, or you might get errors on a floppy or hard disc that mean some files become unusable.
As well as making backups of important files, it is recommended that you make backup copies of applications supplied on discs, and use the backups as your working discs.
You should format the discs that you are using for the backup process and discard any that contain defects, even if they have been mapped out by the formatting process. Do not use discs that have defects.
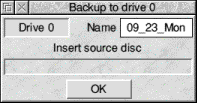
The backup process copies an entire floppy disc (from the 'source' disc to the 'destination' disc) as a single operation. You can only back up onto discs with the same format as the source disc.
Warning: Backing up a disc deletes the entire previous contents of the destination disc.
Note: The floppy disc drive indicator light will remain on at some stages of the backup process, but don't worry, you can still insert and remove discs as instructed.
To back up a floppy disc<:
> If you are using your computer a lot, it's good practice to back up the files you've been working on at least once a day, and to back up all your files once a week, or once a month. Naming discs with the date of the backup will remind you when the backup was made, without having to check the date of the files on the disc.
You can back up your hard discs by copying valuable data and applications to floppy discs. The backup procedure used for hard discs differs from that used for floppy discs.
You should keep backup copies of the following directories:
You should also back up any data you may have produced and applications that you have installed.
Warning: This backup procedure does not back up files that are bigger than the size of a single floppy disc (approximately 1.6MB). If you want to back up such files, you'll need additional software (not supplied by Acorn) or you should back up to alternative media with large enough capacities, such as a second hard disc or a network or tape streamer.
To back up files and directories from your hard disc:
When the copying process is finished, the backup is complete.
If you need more floppy discs you can format them, give them the correct disc name, and then continue with the backup.
You can restore your data by inserting the first backup floppy disc in the disc drive, clicking on the floppy disc icon and dragging its contents to the appropriate directory on your hard disc. When the first floppy disc has been copied over, Dismount it, insert the second disc, click on the floppy disc icon and repeat the procedure; carry on until you've copied all the discs.
You can check whether a disc is free from defects by verifying the disc. This checks that all the data on the disc is readable (it does not check that the data is correct). This is not something you need to do very often, but is a good idea if, for example, you have made a backup of important data and want to check that it is stored safely.
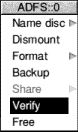
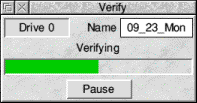
To verify a floppy disc choose Verify from the icon bar menu for the disc drive.
The Verify dialogue box is displayed and the operation starts.
If there are no faults on the disc, the message Disc verified OK appears.
Some types of hard disc incorrectly report addresses of defects using Verify (and *Verify from the command line). To verify a hard disc it is therefore preferable to use the application !Verify, found in the Utilities directory. To use !Verify, just double-click on its icon and follow the instructions on the screen. The number of the standard hard disc shipped with the computer is 4.
If you find that there are defects on the floppy disc, click on Continue to carry on with the verify; repeat this process if any further defects are found.
The easiest way to remove the defects is to format the disc again. This allows you to mark the faulty areas of the disc as bad so that they are not used (don't forget to copy any important files off the disc first!).
If there is a defect on your hard disc, the position of the error on the disc is displayed during the verification process.
When the operation ends, you should have a list of the defects found. Turn to Removing a disc defect and follow the instructions given there.
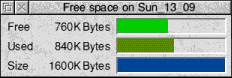
This shows the amount of unused space on the disc, together with the amount of space that has already been used. The total disc size is shown as well. This window is updated whenever the space available on the disc changes.
Adding applications to the hard disc is quite easy. Usually you only need to copy an application from the floppy disc to a directory on the hard disc. Some applications require you to add system modules or fonts to the computer. These are normally supplied as !System and !Fonts files. To add these to the hard disc, merge them using the !Boot application.
Do not copy a !System or !Fonts directly onto your hard disc.
You must not double-click on a !Fonts or !System icon. This will confuse the computer resulting in erratic operation. If you have double-clicked on a !Fonts or !System icon by mistake, you should reset the computer.
Note: You won't need to copy or use any !Scrap applications you find, as one already exists inside the !Boot application.
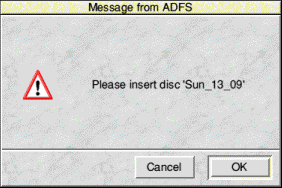
If the file, directory or application you want is on a floppy disc that has been seen by the Filer but is not currently in the disc drive, the Filer asks you to insert the floppy disc (see below). When you do this, the computer finds the required files automatically.
If you decide not to go through with the operation (for example, if the requested disc is not available) click on Cancel.
The desktop remembers the names of the last eight floppy discs that have been inserted into the disc drive. If you insert and use a disc that has exactly the same disc name as one already in use, the 'earlier' disc will be forgotten about. You should always try to use unique disc names, and dismount discs before removing them from the floppy disc drive.
When you are copying from one floppy disc to another using a single floppy drive (by dragging a group of objects) you may be asked to swap the discs occasionally, which becomes tedious when copying many files and directories. It is probably faster to copy the files from floppy disc to hard disc or RAM disc, and then from there to the new floppy disc (see Using a RAM disc).
For more information, consult your Welcome Guide.
If a disc defect error occurs with a floppy disc while you are using it (a rare occurrence) you will see a disc error message.
To correct the error you should copy any files you want to save from the affected disc onto another disc, and then throw the disc away.
A similar error can occur if you try to use a disc that has not been formatted.
If a disc defect error occurs on a hard disc, the error's position is displayed. In this case write down the number displayed and refer to Removing a disc defect and follow the instructions given there.
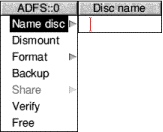
Naming discs
If you're formatting a floppy disc, ensure that it is formatted and not write-protected before you insert it into the disc drive.
Naming restrictions
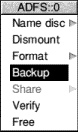
Changing the name of a hard disc
Mounting and dismounting discs
Dismounting floppy discs
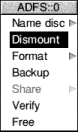
Dismounting hard discs
Formatting discs
Warning: When a disc is formatted, any data that was previously stored on it is permanently lost.
Formatting a hard disc
Formatting a floppy disc
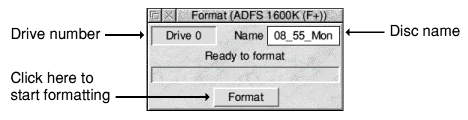
If you don't give a floppy disc a name, the default name given to the disc is based on the date and time, for example 11_09_Mon.
Disc formatted OK.
Disc errors during formatting
RISC OS floppy disc formats
High-density floppy discs (1.44MB IBM type) must be used (they are normally marked HD). High-density discs must be formatted using this format. You must not format non-HD discs as 1.6M, as they will inevitably fail.
This format uses double-density floppy discs (720K IBM type). These discs are also compatible with RISC OS computers that are not fitted with high-density disc drives.
This format is now obsolete and is included for backward compatibility only. It is compatible with RISC iX and the Arthur 1.20 operating system.
This format is now obsolete and is included for backward compatibility only. It is compatible with Arthur 1.20, ADFS on the Master, Master Compact, BBC Model B and BBC Model B+ computers fitted with 3.5" disc drives. Each directory can contain up to 47 files and subdirectories.
Other disc formats
You can format floppy discs in different formats using the Format/Other formats sub-menu. DOS-formatted discs
Discs using this format can be read from and written to by any DOS computer with a high-density 3.5" disc drive. High-density floppy discs (1.44MB IBM type discs) must be used (they are normally marked HD).
The disc can be read from and written to by any DOS computer with a 3.5" disc drive. Double-density floppy discs (720K IBM type) must be used.
Atari-formatted discs
The disc can be read from and written to by any Atari ST computer with a double-sided 3.5" disc drive. Double-density floppy discs (720K IBM type) must be used.
The disc can be read from and written to by any Atari ST computer with a 3.5" disc drive. Double-density floppy discs (720K IBM type) must be used.
UNIX and Apple computers
Checking a floppy disc's format
Backing up discs
Backing up floppy discs
Backing up hard discs
Fitting more data onto backup discs
To fit more information onto floppy discs, you can use the file compression application !Squash; you'll find more information about this in the section on Squash.
Restoring backed-up data to a hard disc
Checking for disc defects (verifying)
Defects on a floppy disc
Defects on ahard disc
Checking the amount of free space on a disc
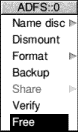
To check how much free space is available on a disc, choose Free from the icon bar menu for the disc drive. Adding more applications to a hard disc
Using several floppy discs
Copying between floppy discs
What to do if something goes wrong
Most errors and problems connected with discs are accompanied by self-explanatory messages. Often all you need to do is acknowledge that you have read the error message by clicking in the appropriate box. There are a few cases that are more serious or need a little extra explanation.
<
A NAME=HEADING2-172>
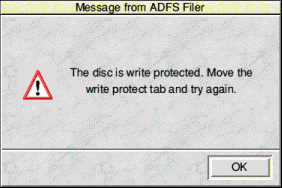
Protected disc
The message shown below indicates that a floppy disc is write-protected. This prevents you from accidentally writing to the disc. You can remove the write protection by sliding the small tab at one corner of the disc so that the hole is blocked off.
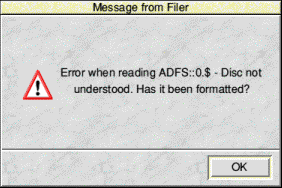
Unreadable disc
The message below indicates that the computer can't read the floppy disc. The floppy disc may not be formatted at all, or it may be formatted in a way that cannot be read on the computer. The computer cannot read discs formatted with Commodore Amiga disc formats, or Apple Macintosh formats (although there is a third party application which does this - ask your supplier).
Disc errors during use
RISC OS 3.7 User Guide - 21 JAN 1997
![]()
![]()
![]()
![]()
![]()
Last Edit: Tue,03 Nov 2015