![[Select]](../images/ro6doc.gif)
|
Application Suite: Chars |
|
|
Chars
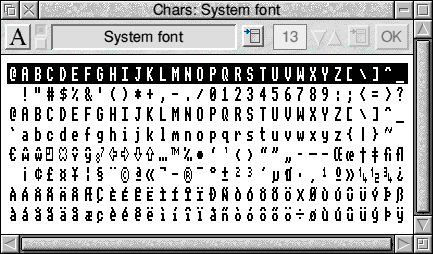 The Chars window Each window shows the full character set in the given font and encoding. If you click SELECT on a character, it is inserted at the caret position in the application which currently owns the input focus (the window with the cream title bar). If you click ADJUST, the character is displayed in a bigger 'zoom' window (note that this only works with outline fonts, not with the System font). Depending on the 'Persistent zoom window' option in the Choices window (see below under "Choices window"), the zoom window disappears automatically as soon as you release the ADJUST button or it remains on screen (in the latter case it is called persistent). The persistent zoom window has a close icon, so you can close it just as any other window. To reopen it, simply click ADJUST again in any Chars window. The font size to be used in the zoom window can be changed in the Display options window (see below). When trying to enter text in a writable menu field or a transient dialogue box, the SELECT click method cannot be used, because this would cause the destination window to disappear. To overcome this problem, you can also insert a character by placing the pointer over it and pressing the character insertion hotkey (e.g. Ctrl). The hotkey to be used can be configured in the Choices window (see below, "The Choices window"). Changing the font, font size etc. The toolbar (at the top of each character window) shows the current font and the font size. The font can be changed by clicking on the pop-up menu button next to the font name and choosing a font from the menu. If the current font is an outline font (i.e. not the System font), then The size can be changed by using the up/down arrows or entering a number in the input field. The change only takes effect if you click on the OK button. A quicker way of changing the font size is to choose a size from the font size menu which appears if you click on the pop-up menu button next to the font size input field. This changes the font size immediately. 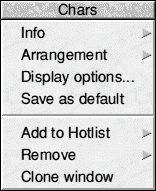 The arrangement of the characters can be changed from the window's menu: You can choose between 32 by 8,16 by 16 and 8 by 32. Also, if you select the option 'Show ctrl', then the window shows the control characters at the top row as inverted letters. So, e.g. to enter Ctrl-C, click SELECT on the inverted letter 'C'. Ticking 'Show grid' shows the character grid (see below, "Character grid"). More advanced options are found in the Display options window: Choose 'Display options' from the window's menu to open it: The Display options window: In this window you can change the font aspect, the line and character spacing and zoom font size. 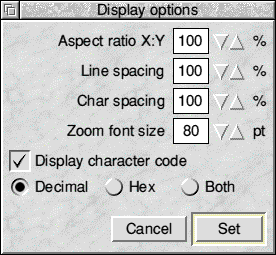 The font aspect determines the width of the characters in relation to their height. Normally, characters are displayed at 100% which is the default. If the aspect ratio is smaller than 100%, the characters appear narrow, if it is greater than 100%, they are expanded. The next two options, line spacing and char spacing can in most cases be left at their default values, i.e. at 100%. Chars automatically leaves enough room vertically to accommodate even the highest character of the font. Horizontally, it uses by default 80% of the widest character (i.e. this corresponds to char spacing 100%) which is enough in almost all cases as it is very unlikely that two very wide characters are next to each other. However, if you want more (or less) space between the rows/columns, then you can increase (or decrease) the line/char spacing. The last value is the font size to be used in the character zoom window (this is the window you call up by clicking ADJUST on a character). This is set for each window individually, so if you have a persistent zoom box (or if you press and hold Adjust) the size of the zoom window may change as you move from one window to another. If you switch "Display character code" on, the character code of the character under the pointer is displayed near the pointer in a small yellow box which also moves as you move the pointer. The code can be displayed in decimal or hexadecimal notation or both at the same time depending on which of the three radio icons in the line below you select. These options can be switched on/off for each window individually. Probably not a feature you would want to switch on for every window, but it was added by popular demand, so at least some people will hopefully find this useful. What about adding a definition of a System font window with "Display character code" switched on to your hotlist? This way you have quick access to character codes in case you need them. If you should really want this feature for every window, simply modify your default setup. Encodings The RISC OS FontManager supports rendering text in different encodings (different choices of character sets), as long as the font used supplies encoding information. This allows you to access additional characters some fonts supply. This is the case for the ROM fonts, which amongst others, include a lot of accented characters for use in Eastern European languages. Unless you specify an encoding, the system's default encoding is used (Latin1 for most users). You may change the encoding by switching from the font toolbar to the encoding toolbar: To do this, click on the toolbar switch icon - this is the small icon to the left of the font name display field that looks like two small option buttons, the top one selected, the bottom one deselected. The encoding toolbar shows the current encoding and allows you to change it by choosing a different one from the encodings menu. The encodings menu shows the different encodings that are installed on your system. As mentioned above, changing the encoding may or may not make any difference. At least for the three standard ROM fonts Trinity, Homerton and Corpus, you should see different (and possibly new) characters when you change from "(Default)" to, say, "Latin2". If you have a "Greek" encoding (standard under RISC OS 5), then can see how the greek characters in the Sidney maths font map to the standard positions for a modern greek font when applying the "Greek" encoding. In general, applying encodings does not make much sense for symbol fonts because most of their glyphs are not found in any of the standard "language" encodings. So Selwyn with anything other than the "(Default)" encoding looks pretty empty. Please note: If you click on a character to insert it at the caret position, then you will only see the same character in the application that receives it if you have chosen the same font with the same encoding in this application. Unfortunately, most applications do not allow you to change the font encoding and will always use the default system encoding. Cerilica Vantage is one example of an application that supports encodings. To switch back to the font toolbar, simply click on the toolbar switch icon again. Entering characters into applications You can "enter" characters at the current caret position by either clicking on them with Select or by pressing the character insertion hotkey while the mouse pointer is over the character. The latter is useful when inserting characters into transient windows that would vanish if you clicked a mouse button. See "The Choices window" to find out how to configure the character insertion hotkey. Please note that either method only sends the bare character. Neither sends any font information to the application owning the caret, so you will only see the same character in the application if you have chosen the same font (and the same encoding, if the one you have chosen in Chars is not "(Default)"). Saving characters as Draw files You can save a character from an outline font as a Draw file by right-clicking on the character while holding down the character saving hotkey. This displays a standard save box from which you can save the Draw file. See "The Choices window" to find out how to configure the character saving hotkey. Default settings The whole set of options can be saved as the default by choosing 'Save as default' from the window's menu. This means that any new window now has the properties of the current window, e.g. the font, encoding, font size etc. This is saved to disc, so the next time you start the application it will still remember which default settings to use. The hotlist One of the most powerful features of Chars is the hotlist: You can add the complete state of a window including all options to the hotlist and give it a name. By choosing the entry from a menu later, you can recall the settings you associated with that name. Supposed you use Dingbats quite often and you want it to be displayed at . 24pt with a line spacing of 120%. Instead of setting all these options every time you want to view Dingbats, you can set them once and then add the current window state to the hotlist: Click menu over the window and follow the submenu arrow of the entry "Add to hotlist". Then, type the name which you want to associate with these settings, e.g. "Dingbats" and click on OK. To recall the settings later, click on the "A" icon to the left of the tool bar. This displays the hotlist. The first entry of the hotlist is always "Default". Choosing this restores the default settings. Below this entry, you can see all the additional entries. Choosing one of these restores the settings associated with the corresponding entry. If you want to modify one of the entries, choose it, change the options, and then use "Add to hotlist" again without changing the name in the writable field. This overwrites the old definition with your modified one. A hotlist entry can be removed by choosing its name from the "Remove" sub-menu. Like the default settings, the hotlist is immediately saved to disc every time you modify it. The Choices window The Choices window is opened by choosing 'Choices...' from the icon bar menu. 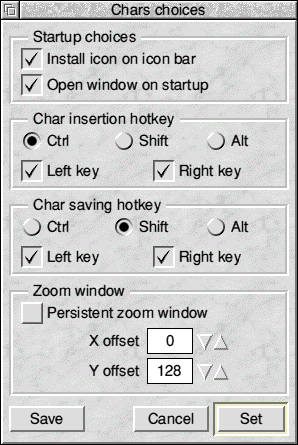 Obviously, this is only possible if there is an Chars icon on the icon bar. If there is not, the 'Choices...' entry is present in the main menu obtained by clicking MENU over any Chars window. The Choices window allows you to configure some options which are global and do not belong to a particular window. These are the startup options, the character insertion hotkey and the zoom window behaviour: When the application starts up it can either install an icon on the icon bar or open a window (or do both). Of course, doing neither of these is not sensible as in this case you could not access the application at all! This option only takes effect if you quit and re-load the application. The character insertion hotkey can be either of Ctrl, Shift or Alt. As each of these keys appear twice on the keyboard, you can choose which one is to be used. If you want both keys to be active, select both option icons, 'Left key' and 'Right key'. By deselecting both option icons, the whole feature (character insertion by hotkey) can be disabled. The options for the character saving hotkey are the same as for the character insertion hotkey. The 'Persistent zoom window' determines whether the zoom window stays on the screen when you release the Adjust button of the mouse (this happens if the option 'Persistent zoom window' is switched on) or whether it is closed automatically (if the option is switched off). The 'X offset' and 'Y offset' fields define the position of the middle of the bottom edge of the zoom window relative to the current pointer position when the zoom window is opened. Positive values move the window to the right (or top respectively) and negative values move it to the left (or bottom respectively). The values are in OS units (in a square pixel mode, there are usually 2 OS units to a pixel). Character grid Some fonts have characters which behave oddly in terms of positioning because they appear to the left or right of their bounding box. For example, this happens with the vowels of classical Hebrew fonts, e.g. HolyBible.HebClassic (by ExpLAN Computers) or Royal.BblcHbrw (by EFF) because the vowels have to appear underneath the preceding consonant. The click-sensitive zone of each character is linked to a global bounding box, so clicking on one of these characters sometimes seems to insert the wrong one. One thing which helps is to increase the character spacing (e.g. to 140%), but even then, you have to click exactly on the vowels or to the left of them. If you switch on the character grid (main menu 'Arrangement.Show Grid'), you see the click-sensitive zone of each character. The submenu allows you to choose the grid colour. The Chars icon on the icon bar Clicking SELECT on the Chars icon opens a new window with the current default settings. Clicking ADJUST on the Chars icon brings the most recently used window to the top. Pressing SHIFT at the same time brings all the windows to the top. While there is no open Chars window at all, clicking ADJUST on the Chars icon re-opens the most recently closed Chars window (in contrast to SELECT, which opens a new window with the default settings). This is useful if you tend to close Chars windows when you do not need them at the moment and then regret this later because you would like to have the same window again without having to setup the settings all over again. Quitting the application You can quit Chars by choosing 'Quit' from the icon bar menu. If there is no Chars icon on the icon bar, the application quits as soon as you close the last open window.
|
|
This documentation is copyright 3QD Developments Ltd 2013 and may not be reproduced or published in any form without the copyright holder's permission. RISC OS is subject to continuous development and improvement as such all information is provided by 3QD Developments Ltd in good faith and is believed to be correct at the time of publication E&OE. 3QD Developments Ltd cannot accept any liability for any loss or damage arising from the use of any information provided as part of the RISC OS Documentation. HTML document version r23142 (3rd November 2015) |